Sunday, March 26, 2017

Industrial Area Renewal - Jones Avenue

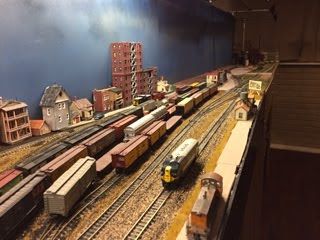
Arial view of Jones Avenue.  Buildings from left to right;
Newsstand, Wuesty Bar (or whats left of it), Leather Goods Shop,
Fredricks Bakery, Salenas Tavern, along 121st Street

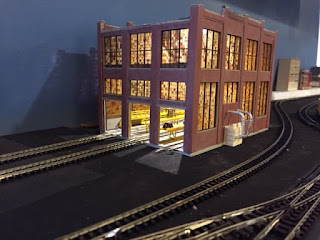
Midwest Fireproof Storage is in the background.  The track had to
realigned to match up with the rail yard table.  I wasn't planning on
having the track that serves Midwest Storage link to anything
however it lined up pretty well with the far yard track and it makes
for a nice run-around  track if it becomes needed.  The roadway is
Monster Modelworks brick sheet street sections.. I figured this is one of the
older parts of town, the Leather Goods shop is one of the oldest buildings
in the city and it has the date of 1846 up on the front of the buikding.


Side shot of Jones Avenue
The streets still need a great deal of work to blend the old brick
street into the concrete roads.  I was initially only going to have a vacant
lot for the remainder of the avenue, but I love buildings too much so there will
be a vacant lot behind the newstand which is next to Wuesty's burned out bar
and the Saxon Hotel will occupy the remainder of the block.


I used thin plexiglass for the base of the block and scribed
the sidewalk lines and curb into it and gave it a misting of
sand colored paint.

More to come!

Tuesday, January 31, 2017

Gottsacker Brewery

The newest large project for the renewal of the industrial area is the Gottsacker Brewery, Their motto is "Taste the Bier of Kings" ~ "Das Bier schmeckt der Könige"
There is an old malting plant where I live that partly inspired this, plus the amount of rail traffic coming in and out of this industry will make it a busy place.  Grain and hops in, empty bottles and crates, outgoing product via truck and rail.
Plastic plumbing tubes and  my favorite painters
tape make up the core of this structure.
Add some leftover plastic bits and other scrap box items


The structure on top is all scrap and the framing
from peel & stick window frames from some
wood structure kit.   The tank & platform on the bottom
are from a yard sanding facility.
Test fitting in the area with the base of the brewery.


The Gottsacker brewery is the Walthers Dairy complex /  wall
section's kit.  Sprayed red w/ a gray wash for the mortar lines.
Added Woodland Scenics LED lights (Love them!) a yellow one is added to the elevator shaft.

More photos to come as I finish the brewery complex.


Friday, January 6, 2017

NRTL Yard Extension & Industrial Area's Renewal

Looking south from the NRTL yard might look like a barren wasteland, but it is actually one of the first parts I ever completed on the tabletop design that I started years ago, it's the industrial area.  99% of the structures are removed and I will need to fix a couple of the tracks so they line up with the mainline and siding tracks from the yard area.
Looking north from the industrial area.  The majority of the trackwork will remain untouched other than the ballasting, as it wasn't my finest effort.  GEO Roberts will soon become part of a brewery complex with the structure in the center becoming the powerhouse.  I will also have malting plant and add back the great Downtown Deco Warehouse, after I fix the side that I hacked off.  (Haste makes waste!)

I don't want to loose this tiny block that contains the burned out hull of Wuesty's bar,  the Anchor Bar, and Salenas Tavern.  Due to the aligning of the tracks between the yard and the industrial areas I had to move the Italian restaurant around the corner and will reconfigure Salenas to the corner.  I'm planing on adding a skinny kithbash of a DPM Bulding as well.  Feeling pretty excited about it all!!
 

Thursday, April 28, 2016

Bell Canning

So I took a little detour in the yard construction in order to add a building right along the edge of the layout because I wanted to do one where you could see the interior folks working on things.  I came up with Bell Canning.  As with everything on the NRTL it is fictitious and I simply envisioned what a small canning company would need in terms of rail traffic.  Product comes in from the field via truck, is washed / shucked / canned in unseen parts of the building and a rail car brings in the rolled steel to make the cans and boxcars will depart with cases of canned goods.  I will put a piece of acrylic in front of the building to keep it from getting knocked off as well as the train cars that will be going into the plant.

The project is a kitbash, using a Micro-trains wood military barracks kit and Walthers brick wall sections.
After cutting the wall section to size I sprayed it with Rustoleum
primer.  I followed up with a whitewash of  alcohol diluted off white
craft paint.  It's pretty easy to come out with a god looking mortared
brick wall with this technique as long as you blot the white mortar and
don't rub it off.

The 2 side walls of the barracks were splice together to make one long
wall.  Here it's glued up and waiting on paint.


After paint and the upper and lower section are joined.  Still going to add roof trusses
and a bunch more detail.  The windows were glazed with crystal clear.

Pre-lighting.  The roof is just cardboard
with strip wood seems.  Painted and colored
with chalks.  The truck receiving dock is just
scrap walls I had with a lentil added to the
top.  The roof over dock building is just
more cardboard, masking tape and paint.
First light installed and a lot of details have been added.  Another
light needs to be added to the other side.


I really like the way the chain lift turned out.  They would use it to lift
the sheet rolled steel out of the gondola cars and then the rolls would be
moved into the canning press machines in another room. I made a roll of the steel
in the photo.  I need to make some more.  I have a lot of scrap box parts laying around.
the scene and I made a furnace/incinerator for the warehouse as well
to keep the crews warm on the cold New Rahel winter nights.

Sunday, March 6, 2016

NRTL Yard Update III

The yard is done with these foam sheets that are
the same height as foam track bed.
You can find these at craft stores, I think there are
4 12"x18" sheets for $3.00. 
The drop feeder wires are all in place and ready to be soldered.
I'm also toying with the background a bit.  I liked a photo that
someone had posted on a Facebook N-scale page that had an alley
scene in it.  All you see are the backyards of the residences.


Added some Woodland Scenics lighting to the interior of the
engine service facility.  I like it.
The windows took a bit to do.  Each individual pane is done with
a fine tip brown Sharpee marker.  Then a wash of Woodland Scenics
rust color paint marker was added over the top of it all.  The interior
platforms are from another engine servicing kit.  I thought they went well inside
of the building.  Still need to add more details!


Displaying IMG_1193.JPG

Friday, January 8, 2016

NRTL yard & engine servicing

The facia has been added & painted black. I painted the pink foam
an earth tone right away, I find that the obnoxious pink tends to
block my creativity and by simply using some Walmart or Home Depot
returned paint in a brown color at usually less than 1/2 the original
 price helps to envision the scene. 
I started the engine servicing building.  It's a Walthers kit and I started
by spray painting the wall sections with two different tone's of red/tan
so there is a variation in color on the brick.  Once that was dried I
applied mortar, using an acrylic gray that was slightly thinned and then wiped
it off right after I applied it.  That is how I usually create mortar lines in brick.
The "just painted" is on the left and the "mortarized" one is on the right.
I think it adds some age to it as well.
The service building is coming along and I've laid out photocopy
switch templates to get an idea for spacing and layout of the yard.

Another view of the templates.


Sometimes getting the rail joiners on in N-scale can be a pain, literally.
How many times I stabbed my fingers I can't count.
I cut the end off an old toothbrush and the drilled a hole in the end to
fit a piece of rail in it and glued it into the handle.  I cut a taper on the end of the
rail to make slide rail joiners on to it even easier.  The tool basically preps the joiner
to the rail size so they slide onto the rail much easier and no more finger stabbing!

When you need a tool and can't
find it anywhere, make it!


Yard all laid out and joiners applied.  Just need to solder them together.

A view from the north.

A view from the south.


Wednesday, November 11, 2015

Stay the Course

"Upon further review.........."
Although the thought of locomotives w/ sound built-in is very appealing, I've decided not to jump the N-scale ship and go to HO scale over them.  I have way too much time & $$ invested in the New Rahel Terminus Line to pull the pin on N-scale.  I have so very many structure kits waiting for me to work on that it could very well take me the next 5 years to get through them all.

A clean slate! A fresh canvas!!
What I have decided to do is to start on a fresh section to reinvigorate my modeling senses.  I have 5.5 finished tables (blank slates that I have yet to do anything with).  I have done some demo work on some of the previous sections, namely removed the turntable from the one area and I'm not certain if it will make a re-appearance.  I wasn't quite happy with it altogether.  So I think I will devote the next who knows how many blog posts on creating a freight yard and engine facility for the NRTL.


So what is a table?  A wood  1x4  framed wheeled section that measures 6' long x 32" wide x 45.5" tall.  Its on lockable and height adjustable caster and has a 1/2" thick plywood top. 
Tables can also be a great area for crap
to migrate to (As you can see from some
of the other tables in the background). 
The backdrop, from my previous post
"New Horizon" is attached w/ Scotch brand
heavy duty velcro.  The center  divider/backdrop 
is supported by 3 18""x  1/2"galvanized  
threaded pipe attached to a threaded 1/2"  
metal light  box cap that is attached to the top.  
I want to get the most out of the area so it'll be double
sided.  (one scene on one side and another on the other side)  

You can see the Box cap, usually used to attach an exterior flood
Lamp.  The lights are under counter flourescent that are zip-tied to
a piece of PVC pipe to keep the weight down.

Here's a side view.  The valance is clamped on right now but it will
Be screwed to the box cap when done.  The light and valance arms
are connected to a 1/2" threaded "T" connector

While there are some light "hot spots", I'm fairly pleased with
the results so far.  Onward to the foam!!