Thursday, April 28, 2016

Bell Canning

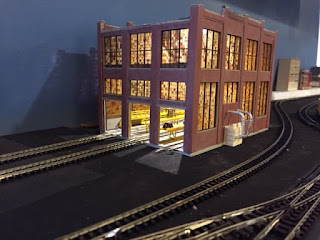
So I took a little detour in the yard construction in order to add a building right along the edge of the layout because I wanted to do one where you could see the interior folks working on things.  I came up with Bell Canning.  As with everything on the NRTL it is fictitious and I simply envisioned what a small canning company would need in terms of rail traffic.  Product comes in from the field via truck, is washed / shucked / canned in unseen parts of the building and a rail car brings in the rolled steel to make the cans and boxcars will depart with cases of canned goods.  I will put a piece of acrylic in front of the building to keep it from getting knocked off as well as the train cars that will be going into the plant.

The project is a kitbash, using a Micro-trains wood military barracks kit and Walthers brick wall sections.
After cutting the wall section to size I sprayed it with Rustoleum
primer.  I followed up with a whitewash of  alcohol diluted off white
craft paint.  It's pretty easy to come out with a god looking mortared
brick wall with this technique as long as you blot the white mortar and
don't rub it off.

The 2 side walls of the barracks were splice together to make one long
wall.  Here it's glued up and waiting on paint.


After paint and the upper and lower section are joined.  Still going to add roof trusses
and a bunch more detail.  The windows were glazed with crystal clear.

Pre-lighting.  The roof is just cardboard
with strip wood seems.  Painted and colored
with chalks.  The truck receiving dock is just
scrap walls I had with a lentil added to the
top.  The roof over dock building is just
more cardboard, masking tape and paint.
First light installed and a lot of details have been added.  Another
light needs to be added to the other side.


I really like the way the chain lift turned out.  They would use it to lift
the sheet rolled steel out of the gondola cars and then the rolls would be
moved into the canning press machines in another room. I made a roll of the steel
in the photo.  I need to make some more.  I have a lot of scrap box parts laying around.
the scene and I made a furnace/incinerator for the warehouse as well
to keep the crews warm on the cold New Rahel winter nights.

Sunday, March 6, 2016

NRTL Yard Update III

The yard is done with these foam sheets that are
the same height as foam track bed.
You can find these at craft stores, I think there are
4 12"x18" sheets for $3.00. 
The drop feeder wires are all in place and ready to be soldered.
I'm also toying with the background a bit.  I liked a photo that
someone had posted on a Facebook N-scale page that had an alley
scene in it.  All you see are the backyards of the residences.


Added some Woodland Scenics lighting to the interior of the
engine service facility.  I like it.
The windows took a bit to do.  Each individual pane is done with
a fine tip brown Sharpee marker.  Then a wash of Woodland Scenics
rust color paint marker was added over the top of it all.  The interior
platforms are from another engine servicing kit.  I thought they went well inside
of the building.  Still need to add more details!


Displaying IMG_1193.JPG

Friday, January 8, 2016

NRTL yard & engine servicing

The facia has been added & painted black. I painted the pink foam
an earth tone right away, I find that the obnoxious pink tends to
block my creativity and by simply using some Walmart or Home Depot
returned paint in a brown color at usually less than 1/2 the original
 price helps to envision the scene. 
I started the engine servicing building.  It's a Walthers kit and I started
by spray painting the wall sections with two different tone's of red/tan
so there is a variation in color on the brick.  Once that was dried I
applied mortar, using an acrylic gray that was slightly thinned and then wiped
it off right after I applied it.  That is how I usually create mortar lines in brick.
The "just painted" is on the left and the "mortarized" one is on the right.
I think it adds some age to it as well.
The service building is coming along and I've laid out photocopy
switch templates to get an idea for spacing and layout of the yard.

Another view of the templates.


Sometimes getting the rail joiners on in N-scale can be a pain, literally.
How many times I stabbed my fingers I can't count.
I cut the end off an old toothbrush and the drilled a hole in the end to
fit a piece of rail in it and glued it into the handle.  I cut a taper on the end of the
rail to make slide rail joiners on to it even easier.  The tool basically preps the joiner
to the rail size so they slide onto the rail much easier and no more finger stabbing!

When you need a tool and can't
find it anywhere, make it!


Yard all laid out and joiners applied.  Just need to solder them together.

A view from the north.

A view from the south.