Sunday, March 6, 2016

NRTL Yard Update III

The yard is done with these foam sheets that are
the same height as foam track bed.
You can find these at craft stores, I think there are
4 12"x18" sheets for $3.00. 
The drop feeder wires are all in place and ready to be soldered.
I'm also toying with the background a bit.  I liked a photo that
someone had posted on a Facebook N-scale page that had an alley
scene in it.  All you see are the backyards of the residences.


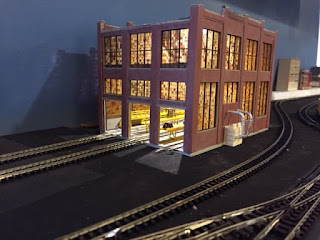
Added some Woodland Scenics lighting to the interior of the
engine service facility.  I like it.
The windows took a bit to do.  Each individual pane is done with
a fine tip brown Sharpee marker.  Then a wash of Woodland Scenics
rust color paint marker was added over the top of it all.  The interior
platforms are from another engine servicing kit.  I thought they went well inside
of the building.  Still need to add more details!


Displaying IMG_1193.JPG

Friday, January 8, 2016

NRTL yard & engine servicing

The facia has been added & painted black. I painted the pink foam
an earth tone right away, I find that the obnoxious pink tends to
block my creativity and by simply using some Walmart or Home Depot
returned paint in a brown color at usually less than 1/2 the original
 price helps to envision the scene. 
I started the engine servicing building.  It's a Walthers kit and I started
by spray painting the wall sections with two different tone's of red/tan
so there is a variation in color on the brick.  Once that was dried I
applied mortar, using an acrylic gray that was slightly thinned and then wiped
it off right after I applied it.  That is how I usually create mortar lines in brick.
The "just painted" is on the left and the "mortarized" one is on the right.
I think it adds some age to it as well.
The service building is coming along and I've laid out photocopy
switch templates to get an idea for spacing and layout of the yard.

Another view of the templates.


Sometimes getting the rail joiners on in N-scale can be a pain, literally.
How many times I stabbed my fingers I can't count.
I cut the end off an old toothbrush and the drilled a hole in the end to
fit a piece of rail in it and glued it into the handle.  I cut a taper on the end of the
rail to make slide rail joiners on to it even easier.  The tool basically preps the joiner
to the rail size so they slide onto the rail much easier and no more finger stabbing!

When you need a tool and can't
find it anywhere, make it!


Yard all laid out and joiners applied.  Just need to solder them together.

A view from the north.

A view from the south.


Wednesday, November 11, 2015

Stay the Course

"Upon further review.........."
Although the thought of locomotives w/ sound built-in is very appealing, I've decided not to jump the N-scale ship and go to HO scale over them.  I have way too much time & $$ invested in the New Rahel Terminus Line to pull the pin on N-scale.  I have so very many structure kits waiting for me to work on that it could very well take me the next 5 years to get through them all.

A clean slate! A fresh canvas!!
What I have decided to do is to start on a fresh section to reinvigorate my modeling senses.  I have 5.5 finished tables (blank slates that I have yet to do anything with).  I have done some demo work on some of the previous sections, namely removed the turntable from the one area and I'm not certain if it will make a re-appearance.  I wasn't quite happy with it altogether.  So I think I will devote the next who knows how many blog posts on creating a freight yard and engine facility for the NRTL.


So what is a table?  A wood  1x4  framed wheeled section that measures 6' long x 32" wide x 45.5" tall.  Its on lockable and height adjustable caster and has a 1/2" thick plywood top. 
Tables can also be a great area for crap
to migrate to (As you can see from some
of the other tables in the background). 
The backdrop, from my previous post
"New Horizon" is attached w/ Scotch brand
heavy duty velcro.  The center  divider/backdrop 
is supported by 3 18""x  1/2"galvanized  
threaded pipe attached to a threaded 1/2"  
metal light  box cap that is attached to the top.  
I want to get the most out of the area so it'll be double
sided.  (one scene on one side and another on the other side)  

You can see the Box cap, usually used to attach an exterior flood
Lamp.  The lights are under counter flourescent that are zip-tied to
a piece of PVC pipe to keep the weight down.

Here's a side view.  The valance is clamped on right now but it will
Be screwed to the box cap when done.  The light and valance arms
are connected to a 1/2" threaded "T" connector

While there are some light "hot spots", I'm fairly pleased with
the results so far.  Onward to the foam!!


Sunday, October 4, 2015

Stay the course or go to HO........that is the question.

So....It's been a bit since a post, especially a meaningful one (at least to me).  I have tons of N-scale structure's (built & still in the box), rolling stock, track & switches, etc. N-scale.  I have not really seriously worked on the railroad for over 1 year.  I like what I see in HO scale, especially structures, and the fact that the locomotives now come standard with sound.  I have a Soundtrax sound system that works with Soundtrax decoders, but I've never installed it.  I think trying to get speakers into an N-scale loco is a project I don't want to tackle.  With the Soundtrax system there is no need for individual speakers but the layout needs to be divided into "sound sections".  One of the things I love about DCC is not having to divide the layout into power districts, so I'm not a fan of dividing things into "Sound districts".  I'm not that electrically smart, I love structure building, and creating a believable environment.  I just don't want to have to dink around a lot with finicky engine stuff.

So the $1m. question, switch to HO or stay w/ N???

Wednesday, June 24, 2015

New Horizon (Background)

I was never really thrilled with the way my existing backdrop looked.  I had used some of the paper background photos, that were glued on to a blue painted masonite (brown press board).  They looked alright when you were at eye level and straight on but the sky paint didn't match the sky color of the printed picture and even the sky color from picture to picture varied and it bugged me.

I am always getting ideas for the New Rahel Terminus when walking through home improvement stores and I came across a 4' x 8' poly (plastic) wall panel.  It is relatively thin and cuts easily.  I used 3 colors of blue plastic rated spray paint on each 8'x 16" section once I cut them to size.  I like how they turned out.  My wife thinks they look a bit dark or stormy. I think they look serious and it matches my mood and the mood of New Rahel's cityscape.


Sunday, January 25, 2015

Welcome Back

I've been on hiatus for about 2 years, finishing up my bachelor degree and  lot of dust has settled over the metropolis of New Rahel and the New Rahel Terminus.  Time has come to get back to the basement and see where I left off.

A little change is in store as I have moved the basement around again, all for a better railroad flow.  That's one of the beauties of doing this on tables or in sections! I did start a new shack for the Edison Electric plant coal yard. Maybe it's a maintenance shop of a place for yard workers to take a snooze in between jobs?  It's a GC Laser structure.  Pretty easy to assemble, all laser cut cardboard / pressboard.  I added a few things for interest and put it on pillars instead of it resting on the ground.


Overall I think it turned out alright.  It was a nice start back into the fray after a long time away!

 The tables are pretty cluttered right now with all the usual junk that one accumulates when doing any project, but now there is room to walk around the entire layout.  We'll see how things take shape in the future.
It's good to be back at it.

Friday, May 9, 2014

Edison Power & Light's Power Plant at New Rahel

It's been a while since  a post, but who's keeping track?  Probably no one.  I thought I'd drop a couple of pictures here on the power plants progress.

I need to weather the 2 new smokestacks
The old one were cracked.  You can see some
of the coal piles in the yard and I have a couple
of pieces of earth moving equip. to model and
add to the scene in addition to a maintenance shed.

The coal cars enter the dump shed that also thaws the frozen coal cars in the winter months.  I still have to paint the coal loads in the cars so they are uniform in color as well as weather the cars.

Overhead of the yard looking north.  On the hill to the right will be a freight transfer building and the track to no where will someday be a wharf and associated buildings.